Now, we know every game worth it’s money has a game state system of some sort. I mean this as in, most games have a main menu, a play state, and a game over state. Something like that. We will have to build this sort of system. For this, we will be utilizing the enum type in C#. Just after where we initialize the field arialHeading, add the following to define an enum named GameState:
enum GameState
{
	MainMenu,
	Gameplay,
	GameOver
}
We will also want to initialize a property to keep track of the current game state:
private GameState _gameState;The next step to setup our game state system is to add some logic to the Update method of Game1.cs. After the comment, “TODO: Add your update logic here,” add the following:
switch (_gameState) {
	case GameState.MainMenu:
    	{
        	UpdateMainMenu(gameTime);
        	break;
    	}

	case GameState.Gameplay:
    	{
        	UpdateGameplay(gameTime);
        	break;
    	}

	case GameState.GameOver:
    	{
        	UpdateGameOver(gameTime);
        	break;
    	}
}
The switch statement allows us to check which game state is currently set a little more compactly than an if statement. Let’s define the methods that we specified for each case in our switch statement. Add the following methods after the Update method but before the Draw method:
private void UpdateMainMenu(GameTime gameTime) {


}

private void UpdateGameplay(GameTime gameTime) {

}

private void UpdateGameOver(GameTime gameTime) {


}
We will also want to add two additional methods for resetting gameplay and changing the game scene:
private void resetGameplay()
{

}

private void changeGameState(GameState gameState)
{

}
In the Draw method of Game1.cs, add the following code after the comment, “TODO: Add your drawing code here”:
spriteBatch.Begin(SpriteSortMode.Deferred, BlendState.AlphaBlend, SamplerState.PointWrap);

switch (_gameState)
{
	case GameState.MainMenu:
    	{
        	DrawMainMenu(spriteBatch);
        	break;
    	}

	case GameState.Gameplay:
    	{
        	DrawGameplay(spriteBatch);
        	break;
    	}

	case GameState.GameOver:
    	{
        	DrawGameOver(spriteBatch);
        	break;
    	}
}

spriteBatch.End();
It’s important to point out that in order to draw anything in MonoGame, you need to have all of your draw calls between the calls: spriteBatch.Begin and spriteBatch.End. It’s also worth mentioning that the last parameter of our spriteBatch.Begin call tells the game we don’t want to smooth images, in order to preserve our crisp pixel art. While we’re at it, change the following line at the top of the Draw method:
GraphicsDevice.Clear(Color.CornflowerBlue);To
GraphicsDevice.Clear(Color.Black);As we did with the update methods for our game states, we will add draw methods for each of our game states. Add the following methods after the Draw method:
private void DrawMainMenu(SpriteBatch spriteBatch) {


}

private void DrawGameplay(SpriteBatch spriteBatch) {


}

private void DrawGameOver(SpriteBatch spriteBatch) {


}
Finally, we will need to add a few methods we will be using in our game class as well as others:
public static int randInt(int minNumber, int maxNumber)
{
	return new Random().Next(minNumber, maxNumber);
}

public static float randFloat(float minNumber, float maxNumber)
{
	return (float)new Random().NextDouble() * (maxNumber - minNumber) + minNumber;
}
The next thing we will do is define our other classes. We will start by creating a new class named AnimatedSprite.cs. We can add a new class by going to the Solution Explorer, right click our project directory, move the mouse over the add option, then click “New Item…”
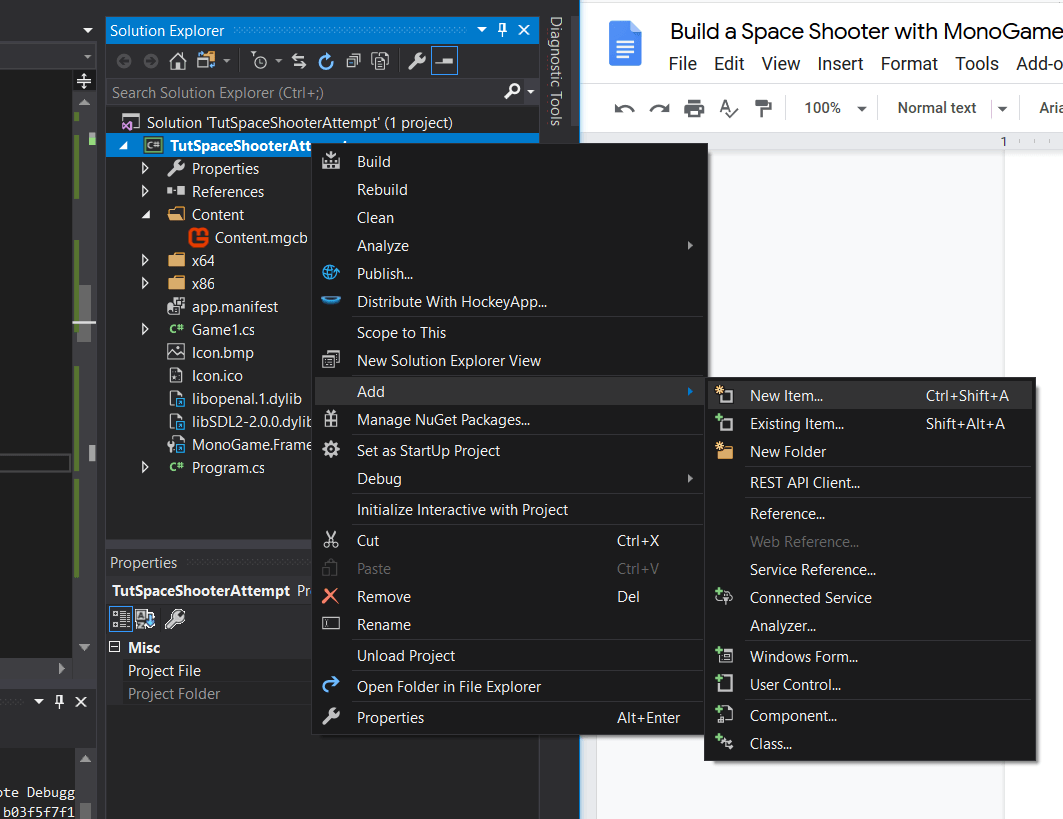
A new prompt will appear allowing us to choose the file template we want, as well as name the file. By default, Visual Studio should have the class template selected, so we can just enter the name we want. Like I said before, we will be naming this class, AnimatedSprite.cs. Once you’re done with that, click the add button, and our new class should be added to our project. Let’s get started diving deep into these classes!
We will start by opening AnimatedSprite.cs. The following two using statements will be required in this class, so add them to the other using statements at the top of the file:
using Microsoft.Xna.Framework;
using Microsoft.Xna.Framework.Graphics;
Next, we will need to add some fields and properties that all animated sprites will have in common. What are they? We will need to store the width and height of each frame, the duration of each frame, the amount of frames, the current frame, and the different fields for the timer. We will also have to keep track if an animation can repeat, and if that animation can’t repeat, we need to know if the animation has finished playing.
private Texture2D texture;
public int frameWidth { get; set; }
public int frameHeight { get; set; }
public int duration { get; set; }
public Rectangle sourceRect { get; set; }
public int amountFrames { get; set; }
public int currentFrame { get; set; }
private int updateTick = 0;
private bool _repeats = true;
public void setCanRepeat(bool canRepeat)
{
	_repeats = canRepeat;
}
private bool _finished = false;
public bool isFinished()
{
	return _finished;
}
The next step is to add the constructor. We will be taking in a texture, the frame width, the frame height, and the duration of the animation. We can figure out the rest inside the class once it’s instantiated. Add the following code to create our constructor:
public AnimatedSprite(Texture2D texture, int frameWidth, int frameHeight, int duration)
{
	this.texture = texture;
	this.frameWidth = frameWidth;
	this.frameHeight = frameHeight;
	this.duration = duration;
	amountFrames = this.texture.Width / this.frameWidth;
	sourceRect = new Rectangle(currentFrame * this.frameWidth, 0, this.frameWidth, this.frameHeight);
}
Finally we will need to add an Update method to our AnimatedSprite class. The instructions we’re trying to execute each frame looks kind of like the following:
IF updateTick < duration THEN
Add 1 to updateTick
ELSE
IF currentFrame < amountFrames – 1 THEN
Add 1 to currentFrame
ELSE
IF _repeats THEN
Set currentFrame to __.
ELSE
Set finished to true
Set the source rectangle to the update rectangle
Set updateTick to __
Let’s add the following to write our Update method and above with real C#:
public void Update(GameTime gameTime)
{
	if (updateTick < duration)
	{
    	updateTick++;
	}
	else
	{
    	if (currentFrame < amountFrames - 1)
    	{
        	currentFrame++;
    	}
    	else
    	{
        	if (_repeats)
        	{
            	currentFrame = 0;
        	}
        	else
        	{
            	_finished = true;
        	}
    		}

    	sourceRect = new Rectangle(currentFrame * this.frameWidth, 0, this.frameWidth, this.frameHeight);
    	updateTick = 0;
	}
}
We are now finished writing the AnimatedSprite class!
Let’s move on to part four!