In the last part of “Build a Space Shooter with Phaser 3”, we finished writing our base Entity class, our player class, and the player movement. In this part we will implement a couple enemies and give them basic AI. At this point you should have an error-free game where you can move the player around via the W, S, A, D keys. If so, it’s time to open Entities.js back up.
At the bottom of Entities.js under the Player class, add three new classes called ChaserShip, GunShip, and CarrierShip:
class ChaserShip extends Entity {
  constructor(scene, x, y) {
    super(scene, x, y, "sprEnemy1", "ChaserShip");
  }
}

class GunShip extends Entity {
  constructor(scene, x, y) {
    super(scene, x, y, "sprEnemy0", "GunShip");
    this.play("sprEnemy0");
  }
}

class CarrierShip extends Entity {
  constructor(scene, x, y) {
    super(scene, x, y, "sprEnemy2", "CarrierShip");
    this.play("sprEnemy2");
  }
}
Classes ChaserShip, GunShip, and CarrierShip should extend the Entity class that we have created in the last part. Then we effectively call the constructor of Entity with provide the corresponding parameters. We will be able to build on top of the Entity class and in a second build our simple AI for each enemy. For each enemy class, under the super keyword, add the following:
this.body.velocity.y = Phaser.Math.Between(50, 100);The above line sets the y velocity of the enemy to be a random integer between 50 and 100. We will be spawning the enemies past the top of the screen, which will cause the enemy to move down the canvas.
Next, go back to SceneMain.js. We will need to create a Group to hold our enemies, the lasers shot by enemies, and the lasers shot by the player. In the create function after the line setting this.keySpace, add:
this.enemies = this.add.group();
this.enemyLasers = this.add.group();
this.playerLasers = this.add.group();
There still won’t be any enemies spawning from the top of the screen yet if we run our game. We first have to create an event (it will act as a timer) which will spawn our enemies. After our playerLasers group, add the following code:
this.time.addEvent({
  delay: 100,
  callback: function() {
    var enemy = new GunShip(
      this,
      Phaser.Math.Between(0, this.game.config.width),
      0
    );
    this.enemies.add(enemy);
  },
  callbackScope: this,
  loop: true
});
If we try running the game now, we should see many GunShip enemies moving down from the top of the screen. Now, we will give our GunShip enemies the ability to shoot. First, we have to create another class called EnemyLaser right after the Player class of our Entities.js file. EnemyLaser should extend Entity as well.
class EnemyLaser extends Entity {
  constructor(scene, x, y) {
    super(scene, x, y, "sprLaserEnemy0");
    this.body.velocity.y = 200;
  }
}
Now we can go back to our GunShip class, specifically the constructor. Under where we set the y velocity, we can add a new event.
this.shootTimer = this.scene.time.addEvent({
  delay: 1000,
  callback: function() {
    var laser = new EnemyLaser(
      this.scene,
      this.x,
      this.y
    );
    laser.setScale(this.scaleX);
    this.scene.enemyLasers.add(laser);
  },
  callbackScope: this,
  loop: true
});
Do note that we are assigning the above event to a variable called this.shootTimer. We should create a new function inside GunShip called onDestroy. onDestroy is not a function used by Phaser, but you can call it anything. We will be using this function to destroy the shoot timer when the enemy is destroyed. Add the onDestroy function to our GunShip class and add the following inside:
if (this.shootTimer !== undefined) {
if (this.shootTimer) {
this.shootTimer.remove(false);
}
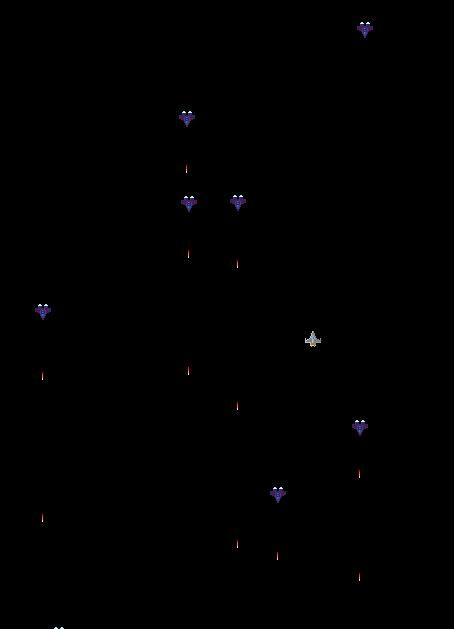
}When you run the game you should see:
When we run the game, you should see the army of gun ship enemies coming down from the top of the screen. All of the enemies should also be shooting lasers as well. Now that we see everything is working, we can cut back the amount of gun ships are being spawned at once. To do this, navigate to our SceneMain.js file and change the delay of the timer we made.
this.time.addEvent({
      delay: 1000, // this can be changed to a higher value like 1000
      callback: function() {
        var enemy = new GunShip(
          this,
          Phaser.Math.Between(0, this.game.config.width),
          0
        );
        this.enemies.add(enemy);
      },
      callbackScope: this,
      loop: true
    });
Back in Entities.js, we will need to add a little bit of code to the constructor of the ChaserShip class:
this.states = {
  MOVE_DOWN: "MOVE_DOWN",
  CHASE: "CHASE"
};
this.state = this.states.MOVE_DOWN;
This code does two things: create an object that has two properties which we can use to set the state of the chaser ship, and then we set the state to the value of the MOVE_DOWN property (the value is the string "MOVE_DOWN".)
We can now add an update function to the ChaserShip class. The update function is where we will code in the AI for the ChaserShip class. We will code the intelligence for the ChaserShip enemy first, since it’s slightly more complicated. Navigate back to Entities.js and in the update function of the ChaserShip class, add the following:
if (!this.getData("isDead") && this.scene.player) {
      if (Phaser.Math.Distance.Between(
        this.x,
        this.y,
        this.scene.player.x,
        this.scene.player.y
      ) < 320) {

        this.state = this.states.CHASE;
      }

      if (this.state == this.states.CHASE) {
        var dx = this.scene.player.x - this.x;
        var dy = this.scene.player.y - this.y;

        var angle = Math.atan2(dy, dx);

        var speed = 100;
        this.body.setVelocity(
          Math.cos(angle) * speed,
          Math.sin(angle) * speed
        );
      }
    }
With this code, chaser enemies will move down the screen. However, as soon as it is within 320 pixels to the player, it will start chasing the player. If you want the chaser ship to rotate, feel free to add the following right after (or at the end of) our chase condition:
if (this.x < this.scene.player.x) {
  this.angle -= 5;
}
else {
  this.angle += 5;
}
In order to spawn the chaser ship, we will have to go back to SceneMain.js and add a new function called getEnemiesByType. Inside this new function add:
getEnemiesByType(type) {
  var arr = [];
  for (var i = 0; i < this.enemies.getChildren().length; i++) {
    var enemy = this.enemies.getChildren()[i];
    if (enemy.getData("type") == type) {
      arr.push(enemy);
    }
  }
  return arr;
}
The above code will allow us to provide an enemy type and get all the enemies in the enemies group. This code loops through the enemies group and checks if the type of the enemy in the loop is equal to the type that is given as a parameter.
Once we added the getEnemiesByType function, we will need to modify our spawner event. Within the anonymous function of the callback property let’s change:
var enemy = new GunShip(
      this,
      Phaser.Math.Between(0, this.game.config.width),
      0
    );
    this.enemies.add(enemy);
to:
var enemy = null;

    if (Phaser.Math.Between(0, 10) >= 3) {
      enemy = new GunShip(
        this,
        Phaser.Math.Between(0, this.game.config.width),
        0
      );
    }
    else if (Phaser.Math.Between(0, 10) >= 5) {
      if (this.getEnemiesByType("ChaserShip").length < 5) {

        enemy = new ChaserShip(
          this,
          Phaser.Math.Between(0, this.game.config.width),
          0
        );
      }
    }
    else {
      enemy = new CarrierShip(
        this,
        Phaser.Math.Between(0, this.game.config.width),
        0
      );
    }

    if (enemy !== null) {
      enemy.setScale(Phaser.Math.Between(10, 20) * 0.1);
      this.enemies.add(enemy);
    }
Going through this block, we add a condition that picks one of our three enemy classes: GunShip, ChaserShip, or CarrierShip to be spawned. After setting the enemy variable to either enemy class, we then add it to the enemies group. If a ChaserShip is picked to be spawned, we check to ensure there are not more than five ChaserShips before spawning another. Before we add an enemy to the group, we also apply a random scale to the enemy. Since each enemy extends our Entity class, which in turn extends Phaser.GameObjects.Sprite, we can set a scale to enemies, just as we can to any other Phaser.GameObjects.Sprite.
In the update function, we need to update enemies in the this.enemies group. To do so, add the following at the end of the update function.
for (var i = 0; i < this.enemies.getChildren().length; i++) {
var enemy = this.enemies.getChildren()[i];
enemy.update();
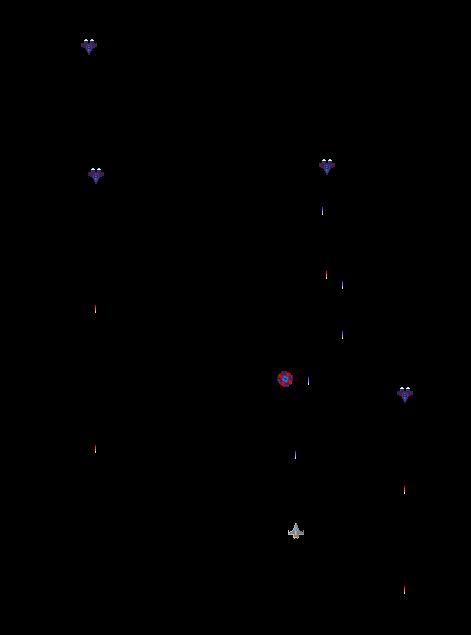
}If we try running the game now, we should see that chaser ships should be moving towards the player ship once they get within distance.
Last, we will finish up this part by giving the player the ability to shoot. Navigate back to the Player class and in the constructor add:
this.setData("isShooting", false);
this.setData("timerShootDelay", 10);
this.setData("timerShootTick", this.getData("timerShootDelay") - 1);
We are setting up what I would call, a “manual timer”. We are not using events for the shooting ability of the player. This is because, we do not want a delay to shoot when initially pressing the space key. In the update function of the Player, we will add the rest of the logic for our “manual timer”:
if (this.getData("isShooting")) {
  if (this.getData("timerShootTick") < this.getData("timerShootDelay")) {
    this.setData("timerShootTick", this.getData("timerShootTick") + 1); // every game update, increase timerShootTick by one until we reach the value of timerShootDelay
  }
  else { // when the "manual timer" is triggered:
    var laser = new PlayerLaser(this.scene, this.x, this.y);
    this.scene.playerLasers.add(laser);

    this.scene.sfx.laser.play(); // play the laser sound effect
    this.setData("timerShootTick", 0);
  }
}
The only thing left we have to do is add the PlayerLaser class to our Entities.js file. We can add this class right under the Player class and before the EnemyLaser class. This will keep our player related classes together, and our enemy related classes together. Create a constructor inside the PlayerLaser class and add the same code to the constructor as we did with the EnemyLaser class. Then, remove the negate sign from where we set the y velocity value. This will cause player lasers to move up instead of down. The PlayerLaser class should now look like:
class PlayerLaser extends Entity {
  constructor(scene, x, y) {
    super(scene, x, y, "sprLaserPlayer");
    this.body.velocity.y = -200;
  }
}
The last thing we need to do to allow the player to shoot is go back to SceneMain.js and add the following condition under our movement code:
if (this.keySpace.isDown) {
  this.player.setData("isShooting", true);
}
else {
  this.player.setData("timerShootTick", this.player.getData("timerShootDelay") - 1);
  this.player.setData("isShooting", false);
}
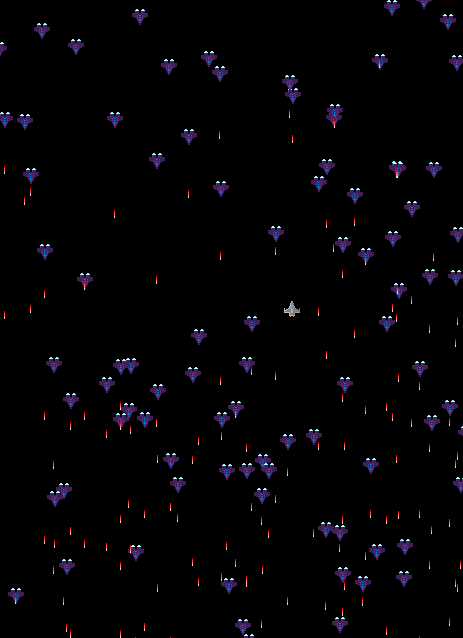
We are finished with adding the ability to shoot lasers for both the player and enemies! Before we move on to collisions, it will be a good idea to add what is called frustum culling. Frustum culling will allow us to remove everything that moves off screen, which frees up processing power and memory. Without frustum culling, if we let our game run for a while, it will look like this:

In order to add frustum culling, we will have to move to the update function of SceneMain. Currently, we should have a for loop where we update enemies. Inside the for after the ending curly brace where we update the enemy, add the following code:
if (enemy.x < -enemy.displayWidth ||
    enemy.x > this.game.config.width + enemy.displayWidth ||
    enemy.y < -enemy.displayHeight * 4 ||
    enemy.y > this.game.config.height + enemy.displayHeight) {

    if (enemy) {
      if (enemy.onDestroy !== undefined) {
        enemy.onDestroy();
      }

      enemy.destroy();
    }

}
We can also add the same for enemy lasers and player lasers:
for (var i = 0; i < this.enemyLasers.getChildren().length; i++) {
      var laser = this.enemyLasers.getChildren()[i];
      laser.update();

      if (laser.x < -laser.displayWidth ||
        laser.x > this.game.config.width + laser.displayWidth ||
        laser.y < -laser.displayHeight * 4 ||
        laser.y > this.game.config.height + laser.displayHeight) {
        if (laser) {
          laser.destroy();
        }
      }
    }

    for (var i = 0; i < this.playerLasers.getChildren().length; i++) {
      var laser = this.playerLasers.getChildren()[i];
      laser.update();

      if (laser.x < -laser.displayWidth ||
        laser.x > this.game.config.width + laser.displayWidth ||
        laser.y < -laser.displayHeight * 4 ||
        laser.y > this.game.config.height + laser.displayHeight) {
        if (laser) {
          laser.destroy();
        }
      }
    }
To add collisions, we will navigate to our SceneMain.js and at a look at our create function. We will need to add what’s called a collider below our enemy spawn event. Colliders allow you to add a collision check between two game objects. So, if there’s a collision between the two objects, the callback you specified will be called and you will receive the two instances that have collided as parameters. We can create a collider between this.playerLasers and this.enemies. In code, we would write this as:
this.physics.add.collider(this.playerLasers, this.enemies, function(playerLaser, enemy) {

});
If we wanted to have the enemy destroyed upon being hit by a player laser, we can write inside the anonymous function:
if (enemy) {
  if (enemy.onDestroy !== undefined) {
    enemy.onDestroy();
  }

  enemy.explode(true);
  playerLaser.destroy();
}
The above code checks if the enemy is still active (and not destroyed), and then destroys it if true.
If we run the game, we should see that instances in the this.enemies group are able to destroy enemies. The next step is to add a collider between this.player and this.enemies:
this.physics.add.overlap(this.player, this.enemies, function(player, enemy) {
  if (!player.getData("isDead") &&
      !enemy.getData("isDead")) {
    player.explode(false);
    enemy.explode(true);
  }
});
We can also add a collider between this.player and this.enemyLasers. By essentially copying the code from above, we can accomplish the same effect, but instead with the enemy lasers.
this.physics.add.overlap(this.player, this.enemyLasers, function(player, laser) {
  if (!player.getData("isDead") &&
      !laser.getData("isDead")) {
    player.explode(false);
    laser.destroy();
  }
});
If we run this, we will get an error that explode is not a function. No worries though, we can just head back to Entities.js and take a look at the Entity class. In the Entity class, we need to add a new function called explode. We will be taking in canDestroy as the sole parameter of this new function. The canDestroy parameter determines whether when explode is called, if the entity will be destroyed, or just be set invisible. Inside the explode function we can add:
if (!this.getData("isDead")) {
      // Set the texture to the explosion image, then play the animation
      this.setTexture("sprExplosion");  // this refers to the same animation key we used when we added this.anims.create previously
      this.play("sprExplosion"); // play the animation

      // pick a random explosion sound within the array we defined in this.sfx in SceneMain
      this.scene.sfx.explosions[Phaser.Math.Between(0, this.scene.sfx.explosions.length - 1)].play();

      if (this.shootTimer !== undefined) {
        if (this.shootTimer) {
          this.shootTimer.remove(false);
        }
      }

      this.setAngle(0);
      this.body.setVelocity(0, 0);

      this.on('animationcomplete', function() {

        if (canDestroy) {
          this.destroy();
        }
        else {
          this.setVisible(false);
        }

      }, this);

      this.setData("isDead", true);
    }
If we run the game, you may notice that the player can still move around and shoot, even if the player ship explodes. We can fix this by adding a check around the player update call and the movement and shooting calls in SceneMain. The ending result should appear as:
if (!this.player.getData("isDead")) {
  this.player.update();
  if (this.keyW.isDown) {
    this.player.moveUp();
  }
  else if (this.keyS.isDown) {
    this.player.moveDown();
  }
  if (this.keyA.isDown) {
    this.player.moveLeft();
  }
  else if (this.keyD.isDown) {
    this.player.moveRight();
  }

  if (this.keySpace.isDown) {
    this.player.setData("isShooting", true);
  }
  else {
    this.player.setData("timerShootTick", this.player.getData("timerShootDelay") - 1);
    this.player.setData("isShooting", false);
  }
}
We have accomplished the “meat and potatoes” of this course in this part. We have added enemies, player lasers, enemy lasers, frustum culling, and collisions. In the next part I will be covering how to add a scrolling background, create the main menu, and the game over screen. I hope you have found this course fruitful so far as much as I have. If you would like to receive updates on future courses I release, please feel free to fill out the form.